 Save
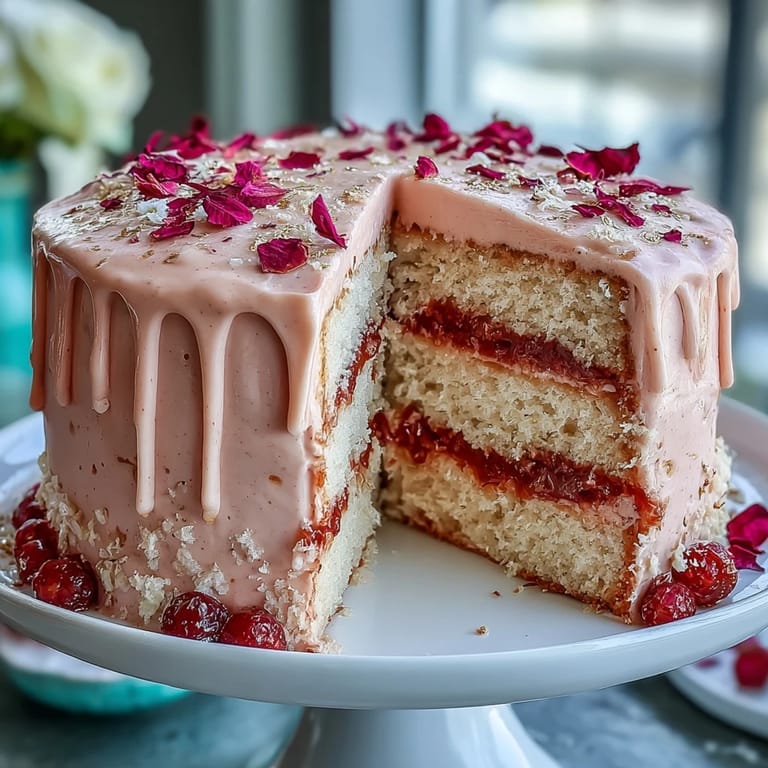
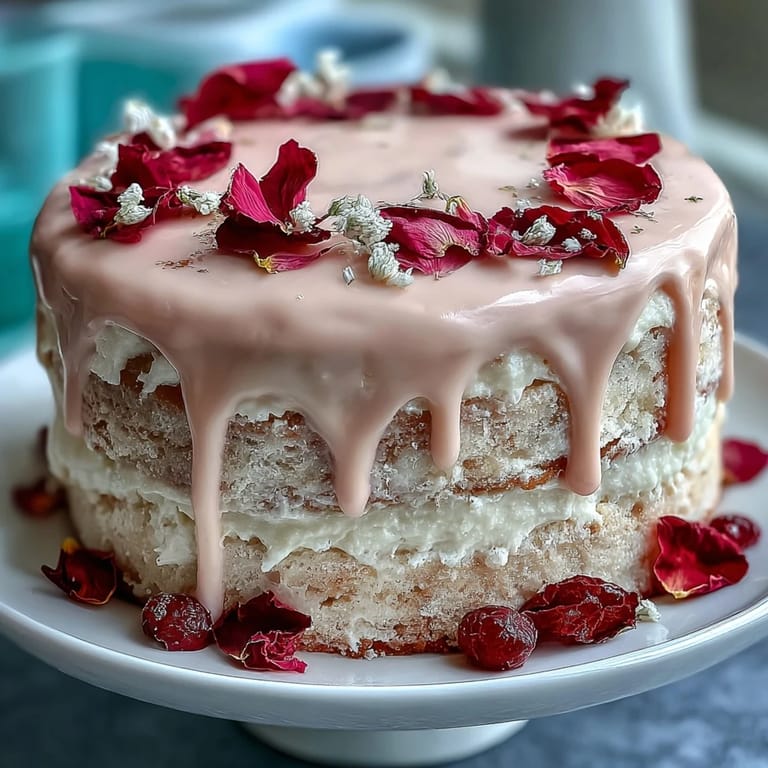
Save All I needed was one whiff of rosé mingling with vanilla and something inside me decided: this cake would define the party. I hadn’t planned on baking something quite so extravagant, but the challenge of pairing delicate wine notes with classic velvet crumb was irresistible. Getting the gold drip right on my first attempt? That’s a laugh—we had shimmering streaks across the counter, a memory I still love. The cake itself is glam yet playful, much like the occasion it celebrates, and with every slice, it truly lives up to its promise of subtle sophistication. There’s honest delight in seeing everyone pause for a second before cutting in, eyes wide at the blush pink layers and that gilded crown.
When I baked this for my best friend’s bridal shower, laughter filled the kitchen as we nervously debated the ‘right’ shade of pink—one person wanted soft blush, another outright Barbiecore. Spreading the buttercream while someone gently nudged berries into place felt almost ceremonial, and we all agreed that painting those golden drips was the most fun part, even if our fingertips sparkled for days after.
Ingredients
- All-Purpose Flour: This forms the elegant structure—sift it well, or risk a dense bite.
- Granulated Sugar: Not just sweetness, but a smooth, tender crumb—measure precisely.
- Baking Soda: Adds just enough lift; always check your box isn’t expired.
- Fine Salt: Balances all sweet notes and surprisingly sharpens the rosé flavor.
- Cocoa Powder (unsweetened): Just a touch enhances color depth and complexity.
- Vegetable Oil: Guarantees a moist slice even after a night in the fridge.
- Eggs: Vital for richness and structure—room temperature only, or the batter won’t blend right.
- Buttermilk: Acid brightens the cake, but make sure it’s not icy cold or it curdles the mix.
- Rosé Wine: Use a dry or sparkling rosé for delicate aroma; go easy if yours is particularly fragrant.
- Vanilla Extract: Rounds out every flavor note—don’t skimp, real extract sings here.
- White Vinegar: The classic velvet trick; it reacts with soda for tenderness.
- Pink or Rose Gel Food Coloring: Control tint drop by drop; a little gives an elegant rose blush, too much looks artificial.
- Unsalted Butter (for Frosting): Beat until cloud-like—this makes frosting billow instead of droop.
- Powdered Sugar: Sift to avoid lumps; resist the urge to skip this if you want a smooth finish.
- Edible Gold Luster Dust: Only use certified edible gold—never craft glitter!
- White Chocolate Chips & Heavy Cream: Melt slowly together or the gold drip seizes, causing streaks.
- Vodka or Clear Lemon Extract: Combines with luster dust for a quick-drying, vibrant gold paint.
- Pinch of Salt (for Frosting): Makes every sweet note ‘pop’ instead of cloying.
Tired of Takeout? 🥡
Get 10 meals you can make faster than delivery arrives. Seriously.
One email. No spam. Unsubscribe anytime.
Instructions
- Prep the Pans:
- Grease and line your pans, pressing parchment into corners so nothing sticks—hear the crinkle, it means you’ll get a smooth release.
- Mix Dry Ingredients:
- Sift flour, sugar, baking soda, salt, and cocoa into a big bowl, letting the cocoa lightly tint the mixture as you work.
- Blend Wet Ingredients:
- Whisk oil, eggs, buttermilk, rosé, vanilla, and vinegar until glossy and creamy—if it smells a little tangy, you’re doing it right.
- Make the Batter:
- Pour wet into dry and gently fold; add food coloring and watch the batter blush with rosy promise.
- Bake:
- Carefully fill pans, smoothing the top, and bake until domes spring back and a toothpick emerges mostly clean.
- Cool Cakes:
- Let cakes rest in pans a bit; then invert and listen for the little thump as each layer releases onto the rack.
- Whip Rosé Buttercream:
- Beat butter till it nearly looks white, then gradually swirl in sugar and rosé until fluffy and light enough to hold a soft peak.
- Layer and Crumb Coat:
- Stack cakes with generous buttercream layers, pressing each one down so the filling gently bulges at the edge, then smooth a thin crumb coat all around.
- Chill and Final Coat:
- Chill briefly so the layers firm up, then finish with a swoosh of plush buttercream around the outside.
- Make Gold Drip:
- Melt chocolate and cream together, cooling just until it’s barely warm to the touch; drip around the cake edge and let it set.
- Paint On Gold:
- Mix luster dust with alcohol to make a paint, then brush each drip gold with careful, gentle strokes.
- Decorate:
- Add edible rose petals or fresh berries for charm, then stand back and admire your masterpiece under good light.
 Save
Save The cake wasn’t just dessert that day—it became the photo everyone posted, the scent people remembered, and the slice secretly devoured for breakfast the next morning. Even the small gold flecks left on our plates felt like a wink to the magic we’d created together.
Secrets for the Fluffiest Layers
Room temperature ingredients are the not-so-secret weapon for a velvet crumb—when the batter is even and blends smoothly, you get airy, tender layers every time. I once tried skipping this step and ended up with a cake that tasted fine but wasn’t nearly as eye-catching or easy to slice.
Nailing the Perfect Pink Tone
Tinting the batter is half art, half science; use a toothpick to add gel color gradually until you reach that dreamy blush. Never add too much at once because you can always deepen the shade, but you can’t make it lighter again.
Mastering the Gold Drip Effect
Room temperature is everything for that rippling gold drip—let your melted chocolate cool just long enough so it’s thick but still flows gently over the edge, or you’ll end up with puddles down the cake stand. I always mix the luster dust and vodka just before painting so the color is rich and stays put, sparkling with each brushstroke.
- Test a drip on the back of the cake before committing to the front.
- Keep a clean paintbrush for edible decorations only.
- Wait until the drip sets before adding petals or berries so nothing slides off.
 Save
Save This cake feels like an event—and every slice is a tiny celebration waiting to happen. If ever there was a dessert to make memories with, this is it.
Recipe FAQ
- → Can I use sparkling rosé instead of still rosé?
Yes—sparkling rosé adds a lively, slightly brighter note. Use the same amount, but reduce added liquid elsewhere if the batter seems too loose; sparkling can lighten the crumb.
- → How do I keep the buttercream from becoming too soft?
Beat butter until light, then add sifted sugar in stages. Chill the crumb coat before the final layer, and refrigerate between steps if working in a warm kitchen. Add more powdered sugar to stiffen or a splash of chilled rosé to loosen as needed.
- → What's the best way to make a smooth, even gold drip?
Use cooled but still-pourable white-chocolate ganache for the drip. Apply with a spoon or squeeze bottle near the edge, let it settle, then paint on edible gold luster once set. Test drip thickness on a bowl first.
- → Can I omit alcohol and keep the rosé flavor?
Yes—substitute nonalcoholic rosé or a mix of white grape juice and a splash of vinegar for acidity. You can also use a few drops of rosewater for floral notes, but adjust to taste to avoid overpowering bitterness.
- → How do I get even, level layers?
Weigh or evenly divide batter between pans, tap pans to release air, and use a toothpick to check doneness. Once cooled, level with a serrated knife or cake leveler before stacking for stable, even layers.
- → How should I store and prepare ahead?
Make layers a day ahead and wrap tightly in plastic; refrigerate. Assemble and chill between frosting steps. After decorating, keep refrigerated and bring to room temperature before serving for best texture.