 Save
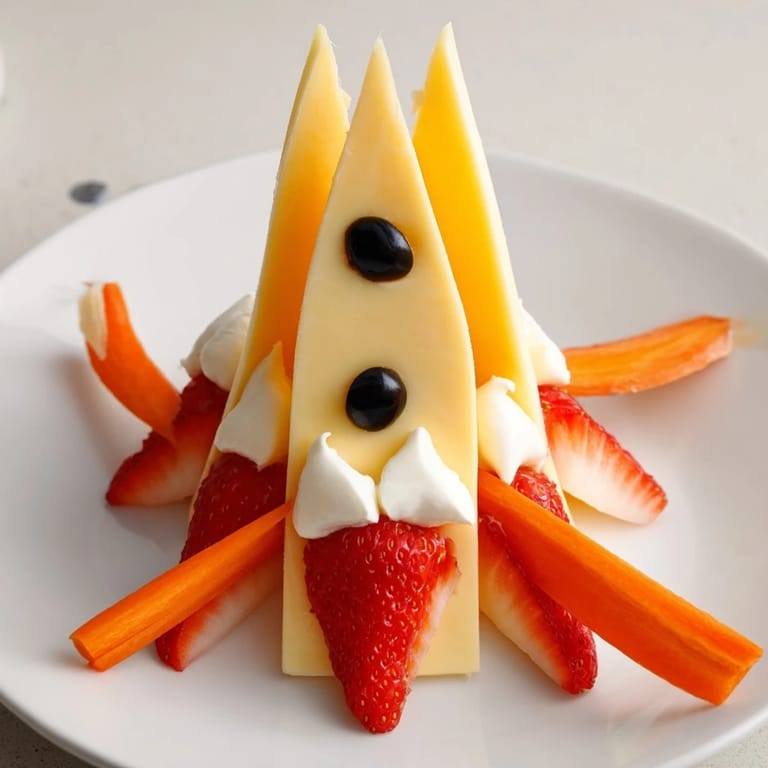
Save My nephew announced he was building a rocket ship out of cheese, and I had exactly fifteen minutes to make it happen before his birthday party started. I grabbed what I had in the fridge—sharp cheddar, strawberries, cream cheese—and suddenly understood what he meant by the wild sketch he'd shown me. The wedges became the fuselage, the berries transformed into flames, and watching his face light up when he saw it sitting on the platter made every careful arrangement worth it.
I remember standing in my kitchen watching my kids and their friends grab handfuls of this thing—no forks, no plates, just pure chaos in the best way. One girl even asked if she could take a photo for her phone before eating it, which somehow felt like the ultimate compliment.
Ingredients
- Sharp cheddar cheese (200g), cut into pointed wedges: The sharpness keeps this from feeling one-note, and those wedges give you the geometric rocket body you're after—pointy tips matter more than you'd think.
- Fresh strawberries (200g), hulled and sliced lengthwise: The red is your flame, and lengthwise slices fan out better than halves, creating that fiery explosion effect.
- Cream cheese (100g, optional): This is your structural glue, holding wedges steady where they might otherwise slip around.
- Black olives, sliced (optional): These become the porthole windows, giving your rocket personality and visual depth.
- Fresh mint leaves (optional): A green accent that balances all the red and orange tones on your platter.
- Carrot sticks (2-3, optional): Thin ones work as rocket fins and reinforce the color story you're building.
Tired of Takeout? 🥡
Get 10 meals you can make faster than delivery arrives. Seriously.
One email. No spam. Unsubscribe anytime.
Instructions
- Shape your rocket body:
- Arrange your cheddar wedges on the platter in a sleek point, overlapping them slightly so they nestle together and create that tapered fuselage shape. Think of building a chevron pattern pointing outward, and don't be shy about angling them—the asymmetry is what makes it look intentional and alive.
- Cement everything together:
- Use small dabs of cream cheese between wedges as your adhesive if they're sliding around. This only takes thirty seconds and saves you from the cheese avalanche moment that happens when someone reaches for a piece.
- Create the flame:
- Fan your strawberry slices out at the base of the rocket, arranging them so they radiate outward like actual fire bursting backward. Overlap them slightly for drama and let the reds bleed into each other.
- Add the details:
- Press olive slices into the cheese wedges to create windows or panel lines that make this feel intentional rather than random. Stick carrot sticks upright as fins or lay mint leaves across the platter as accent colors.
- Present and serve:
- This is best served immediately while everything is fresh and the colors pop, though you can cover it and refrigerate for up to two hours before your event.
 Save
Save This snack taught me that presentation isn't pretentious when it genuinely changes how people eat—suddenly they're slowing down, looking at what they're grabbing, turning a simple cheese platter into an event. That matters more than you'd expect at a kids' party.
Variations That Work
You're not locked into sharp cheddar and strawberries, even though that combination is flawless. Gouda gives you deeper amber tones, Swiss brings elegance with its holes and pale gold, and mixing multiple cheeses creates visual interest without adding complexity. Mango slices create an orange flame effect that reads differently but still works, and orange slices give you the most literal fire illusion. Once you realize this is just an arrangement formula, the combinations become obvious.
Serving Ideas and Pairings
Crackers and breadsticks next to the platter turn this from a snack into a fuller appetizer spread, though honestly it's perfect standing alone at a kids' party where you want the edible art to be the star. For adults, put it out at a charcuterie moment and watch people gravitate toward it simply because it made them smile. The beauty of this is that it works at brunch, kids' birthdays, office potlucks, and casual game nights—wherever you need something that tastes good and looks like you tried.
Final Thoughts
The magic here isn't the ingredients or the technique—it's that you're giving people permission to play with their food again. Every time I make this, someone says it's too pretty to eat, and then three seconds later they're happily proving themselves wrong.
- Set this up no more than two hours before serving to keep the fruit fresh and the cheese at its best temperature.
- If you're feeding picky eaters, you can make it even simpler with just cheese and strawberries, skipping the olive and carrot garnish.
- This is the rare appetizer that tastes exactly as good as it looks, which is the whole point.
 Save
Save This is proof that food can be art and still taste like actual snack happiness. Make it once and you'll find excuses to make it again.
Recipe FAQ
- → How do I keep the cheese wedges stable?
Use small dabs of cream cheese between the wedges to help hold the rocket shape firmly on the platter.
- → Can other fruits replace the strawberries for the flame effect?
Mango or orange slices work well as alternatives to create vibrant flames beneath the cheese rocket.
- → What types of cheese work best for this snack?
Sharp cheddar provides a bold look, but Gouda or Swiss can add color variety and different flavor profiles.
- → Are there any garnish suggestions to enhance the presentation?
Thin carrot sticks mimic fins, black olive slices create windows, and fresh mint leaves add a pop of color to the platter.
- → How long can this snack be prepared in advance?
It can be assembled ahead and refrigerated, but for best flavor and appearance, serve shortly after arranging.