 Save
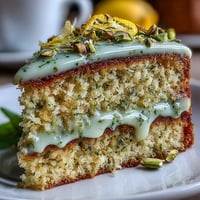
Save There are days when a brunch table just begs for a little something out of the ordinary, and that was exactly the mood when I first tried my hand at a mini matcha birthday cake meant for smashing. The electric whir of the mixer and the fresh, grassy aroma of matcha drifting through the kitchen felt almost mischievous on a lazy Sunday morning. My cat watched, fascinated, as I tried to beat butter to cloudlike perfection—unsuccessfully at first, which left us both dusted with a fine coat of powdered sugar. There’s a certain thrill in knowing you’re about to serve something adorable and unexpected at a daylight celebration. This modest-sized cake has quickly earned a place in my heart for being just fancy enough without ever making brunch too serious.
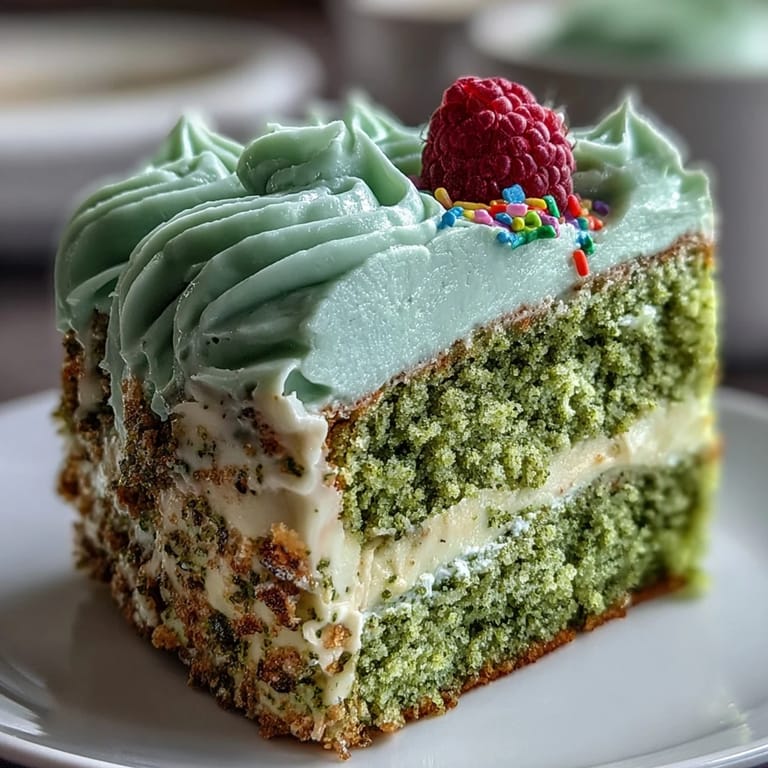
One time, I surprised a friend on her birthday by assembling this cake while we sipped lattes and recapped our week. We laughed over the fact that the hardest part was waiting for the cakes to cool, resisting immediate gratification just long enough to stack the layers with extra spoonfuls of frosting. She insisted on covering the top with way more sprinkles than planned, declaring it 'officially celebratory.' She still reminds me that it was the first time she’d ever had birthday cake for brunch and the last time she shared a slice so willingly. Little moments like that have made this matcha cake a recurring excuse for our catch-ups.
Ingredients
- All-purpose flour: Using standard all-purpose creates a light crumb; a little sifting ensures no lumps sneak through.
- Granulated sugar: Don’t skimp—this keeps the matcha from being too bitter and helps form a tender base.
- Baking powder and baking soda: The combo means just the right lift; too much of either yields a dense crumb or odd flavor, so measure them with care.
- Salt: Just a pinch makes every other flavor pop, especially the subtly sweet matcha.
- Matcha powder (culinary grade): Culinary matcha holds its color and doesn’t overpower with bitterness—look for bright green powder.
- Whole milk: Room temperature milk blends smoothly and helps the cake rise evenly.
- Egg: One large, room-temperature egg binds everything without weighing down the cake.
- Vegetable oil: Choose a neutral oil for a fluffier and moister crumb than butter alone provides.
- Vanilla extract: Don’t skip this touch—it smooths out the earthiness and adds warmth to the batter and frosting.
- Unsalted butter (for frosting): Softening is key; trying to beat cold butter is how I’ve learned patience in the kitchen.
- Powdered sugar: Sifting first ensures a silky, clump-free frosting every time.
- Milk (for frosting): Adjust as needed for the frosting texture you want—more milk for spreading, less for piping thick swirls.
- Optional toppings (sprinkles or fresh berries): These bring color and crunch, and I’ll never say no to a berry for balance.
Tired of Takeout? 🥡
Get 10 meals you can make faster than delivery arrives. Seriously.
One email. No spam. Unsubscribe anytime.
Instructions
- Get ready to bake:
- Fire up your oven to 350°F (175°C), then grease and line two 4-inch pans—a quick swipe of oil and a parchment circle does wonders.
- Mix the dry magic:
- Sift the flour, sugar, baking powder, baking soda, salt, and matcha right into a medium bowl; breathe in that vivid, grassy matcha scent.
- Whisk the wets:
- In another bowl, combine milk, egg, oil, and vanilla, whisking until smooth and lightly frothy—don’t overdo it.
- Make the batter dance:
- Pour the wet ingredients over the dry and use a spatula to gently fold until just blended; a few streaks are fine, and will even out as it bakes.
- Pan and bake:
- Divide the batter evenly between your pans, smooth the tops, then bake 15–20 minutes—peek in at the 15-minute mark so you don’t miss that golden edge.
- Cool it down:
- Let cakes cool in the pans for about five minutes, then carefully turn onto a wire rack so the air can work its cooling magic.
- Frosting time:
- Cream the softened butter until pale and fluffy, gradually beat in sifted powdered sugar, then finish with milk, vanilla, and a pinch of salt for that irresistible spread.
- Assemble and decorate:
- Layer cake, spread plops of frosting between each one, then generously cover the outside—garnish with sprinkles or berries for a festive flourish.
- Serve up fun:
- Present at brunch and let everyone take a dramatic first smash or—if you prefer—simply slice and savor the occasion.
 Save
Save  Save
Save I’ll never forget the brunch where my friends sang 'Happy Birthday' in mismatched keys, then dramatically smashed the little cake as if they were on a cooking show. It turned into a flour-dusted mess that had us giggling for a solid minute, but it was exactly the sort of joyful chaos a birthday should have.
Making Ahead for Brunch Gatherings
Once, I baked the layers the night before and wrapped them tightly—by brunch, they were just as soft and ready to go. This not only saved me some morning rush but let the flavors settle and the crumb firm up for easier frosting. If there's any leftover cake, a quick blitz in the microwave brings it right back to life. Just wait until the last minute to frost, so everything looks neat and fresh. Even when made ahead, this cake never disappoints for a spontaneous gathering.
Switching Up Flavors and Toppings
The matcha base is versatile—I’ve swapped in a dash of lemon zest or used almond extract in the frosting when I craved something new. Fresh strawberries or a mix of colorful sprinkles always liven up the look and add pops of texture. Occasionally I’ll tuck a spoonful of raspberry jam between layers before frosting, which makes every slice a pleasant surprise. Don’t hesitate to riff on the toppings based on what’s in your fridge. Half the fun is seeing how different each cake can be for the next celebration.
Troubleshooting for Tiny Cakes
My first attempt at a mini cake overflowed because I overfilled the pans—less is more here, truly. Use a skewer to test the doneness; if it comes out sticky, give it a few more minutes and check again. A thin crumb coat traps stray crumbs and makes decorating way easier.
- Let the pans cool a couple minutes before unmolding so the cakes hold together.
- If you ever misjudge the matcha, a dusting on top saves the color.
- Don’t forget to adjust baking time if you use different-sized pans.
 Save
Save 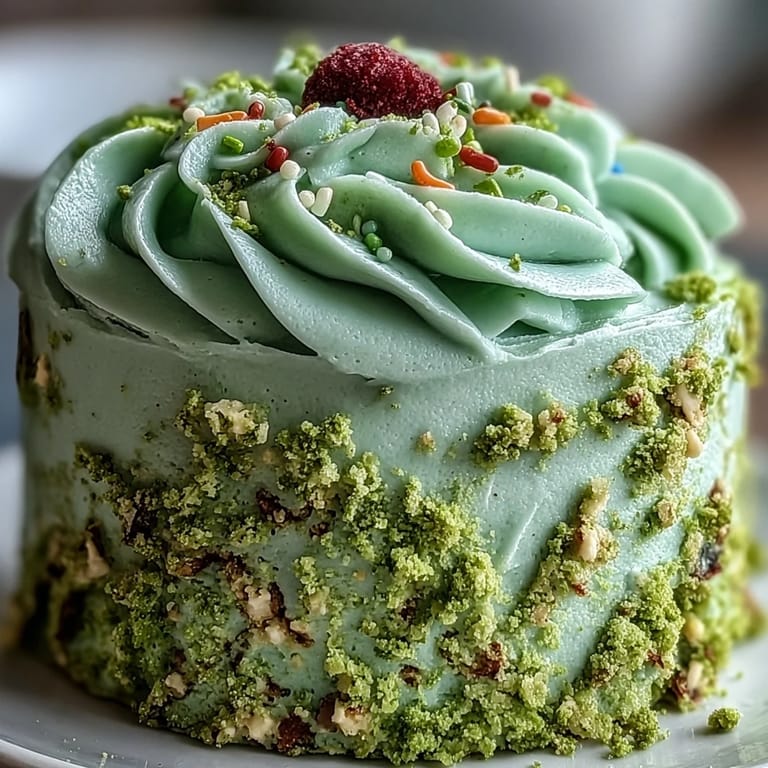 Save
Save Sharing this mini matcha cake always brightens the mood and makes brunch feel a little more festive. Here’s hoping it becomes a quirky tradition in your kitchen too.
Recipe FAQ
- → How do I boost the matcha flavor?
Use culinary-grade matcha and consider increasing the powder by a teaspoon for a greener, more pronounced taste. Fold gently so the cake stays tender.
- → Can I make this dairy-free?
Yes. Replace whole milk with a plant-based milk and use vegan butter for the frosting. Texture may vary slightly but flavor remains bright.
- → How can I tell when the cakes are done?
Bake until a toothpick inserted in the center comes out clean or with a few moist crumbs. Tops should spring back lightly to the touch.
- → Best way to avoid overmixing?
Combine wet and dry ingredients until just incorporated; stop when streaks disappear. Overmixing develops gluten and can make layers dense.
- → How should I assemble for a neat finish?
Level layers if needed, spread frosting between layers, stack, then apply a thin crumb coat and chill briefly before a smooth final layer. An offset spatula helps even the surface.
- → What toppings pair well with matcha?
Fresh berries, light sprinkles, or a dusting of extra matcha on the frosting enhance color and balance the earthiness of the cake.